If you’ve done any web application pen testing or bug bounty hunting, you’re probably familiar with Burp Suite. If you haven’t used Burp Suite before, this blog post series is meant for you.
What is Burp Suite and why should you use it? Burp Suite is a suite of web application testing tools that help you intercept, modify and automate your interactions with a web application. If you do CTFs, this will make your life a lot easier. And if you want to get into web application testing, Burp Suite is a great tool to have.
This post covers installation, configuration, and the Target and Proxy tools.
Installation and Setup
Burp Suite (from now on, just “Burp”) has a free edition and a professional version. The pro option costs $400. You can request a 7 day trial of that here, or download the free Community Edition here.
Once you’ve downloaded and installed the program, you’ll need to configure your browser to direct the traffic to Burp Suite.
Burp functions by intercepting all traffic from a browser–allowing you to inspect it, modify it, etc.–and then forwarding the requests on. There are two options for proxying traffic to Burp.
- You can either configure proxy settings within your browser settings (not recommended as you have to manually turn this on or off each time).
- You can install a browser plug-in like FoxyProxy which lets you configure the proxy once, and then turn the proxy on/off with a single click.
I recommend downloading FoxyProxy, and then creating a profile for BurpSuite. You do this by clicking the FoxyProxy icon, and then clicking options.
Next, click Add and then fill out the form (I used IP address 127.0.0.1/localhost and port 8081).

Once you’ve saved that, you can click the FoxyProxy icon again and turn the proxy on.
Depending on which browser you use, you might want to make use of browser profiles so that settings, cookies, etc. are cleared for your web testing profile. Alternatively, you could use a different browser.
You also need to set up the Burp certificate so that HTTPS requests work properly (otherwise you will get certificate warnings). See this link for details on how to set that up.
You might also consider using a VPN so that your home IP address is not blacklisted by websites that make use of WAFs.
BurpSuite Proxy Settings
Once you’ve got your browser proxy and certificates set up, open up BurpSuite. If you have the free version, you will have to select “Temporary project.” Accept the default settings.
Then, you should see a bunch of tabs. Click the “Proxy” tab and then click “Options.”
You will need to click “Add” and add the IP address and port name that you configured in FoxyProxy.

Test everything out
With FoxyProxy enabled, and the same IP address and port configured in the Proxy Options tab of Burp Suite, navigate to a web page in the browser that is using FoxyProxy.
A good example site might be http://xss-game.appspot.com
The website won’t load, because Burp has intercepted the request.
If you go to Burp, you will see something like this:

Notice that the Proxy tab and Intercept tabs are both highlighted orange. This will happen when a new event has occurred in a given tab, or some kind of alert has been generated. We’ll see this again later when we send requests to other tools in Burp Suite.
You can look at the request and its headers in any of three tabs: Raw, Headers or Hex. To complete the request, click “Forward.” If you want to stop intercepting traffic, you can click “Intercept is on” and the text (and styling) will change to say “Intercept is off.”
By default, intercept is on when you open Burp.
Proxy
We’ve already seen some of the Proxy tab while configuring the Proxy (Options sub-tab) and viewing our first intercepted request (Intercept tab).
HTTP History
If you click the HTTP History tab, you will see a chronological list of requests that Burp made. This includes the original URL we navigated to, future pages we navigate to, and all of the resources that are requested alongside those pages. For example, this screenshot shows the requests from two pages that I navigated to:

You can click on each of these and details will be loaded into the bottom pane.
If you right-click any response, you get a whole menu of options. You can add a comment, send the request to other Burp tools (which we’ll cover in upcoming blog posts), add to scope, request in browser, and more.

The concept of scope is important, and applies across many tools within Burp. We’ll cover this more in the Target section.
Filtering
Lastly, you can filter the HTTP history list by clicking this bar:

This filter bar appears in many places throughout the application. I wish the UI were different so it was more obvious that you can interact with it, but definitely click on it in various tools to get a sense of what your filtering options are.

As you select/de-select items, the filter bar preview will update to say what filter(s) you’ve selected.
Proxy Options
There are many other options in the Proxy > Options tab. I won’t list all of them here, but you can configure:
- What types of client requests to intercept
- How responses should be modified (removing Javascript form validation, etc.)
- Match and Replace, which allows you to use regexes to set HTTP headers. You could use this to automatically swap out your user-agent header or cookies, for example.
Target
Next, let’s click on the Target tab and then click Site Map (if it isn’t already selected).
This is similar to the HTTP history in that it shows all of the web pages and resources that you’ve requested. The SiteMap, however, shows all of these requests in a tree view that matches the structure of the website.

You can see that the lefthand pane has the XSS Game website, plus a few others ites, like Google fonts.
If we open up the tree, we can see level1, static, and other folders and files underneath. Each of these requests can be loaded in the righthand pane, with more details about the request and response in the lower pane. This might seem redundant, and it kind of is, but there are benefits to different data perspectives.
Each of the items in the lefthand pane has an icon next to it:
- The gear icon means that it’s dynamic, or that it’s sent data. In this case, I typed “hi” into the level 1 input box and clicked Send.
- Directories are denoted by folder icons.
- Individual pages are denoted by page icons. Sometimes, these have styling to them (like the JS files).
Again, we can click the filter bar and select filters for the data. These filters can include keywords, MIME types, file types, status codes, and more. If you set filters and want to remove them, click the gear icon and select “restore defaults.”

Scope
Lastly, let’s talk about scope. Scope applies to many different tools, and can be configured either in the Target > Scope tab and/or individually in different tools.
Scope is an important concept, especially if you are pen testing. If you use other tools (like Spider, which we’ll cover in upcoming posts) without a scope set, it will be time-consuming, and might also send requests to websites other than the target site. So let’s scope down our results by clicking on the “Scope” tab.
Click “Add” in the “Include in scope” section. Because I am visiting the XSS Game site, I want to only include that in my scope (and not include Google fonts, etc.)
So, I enter “xss-game” into the pop-up and click OK.

You will see a pop-up asking if you want to exclude all out-of-scope items. For now, I clicked “no”.
If you go back to the Site Map tab, you’ll see that all of the sites are still listed.

We need to apply our scope to the list. Click the filter bar and check “Show only in-scope items” and then click the filter bar again to hide it. 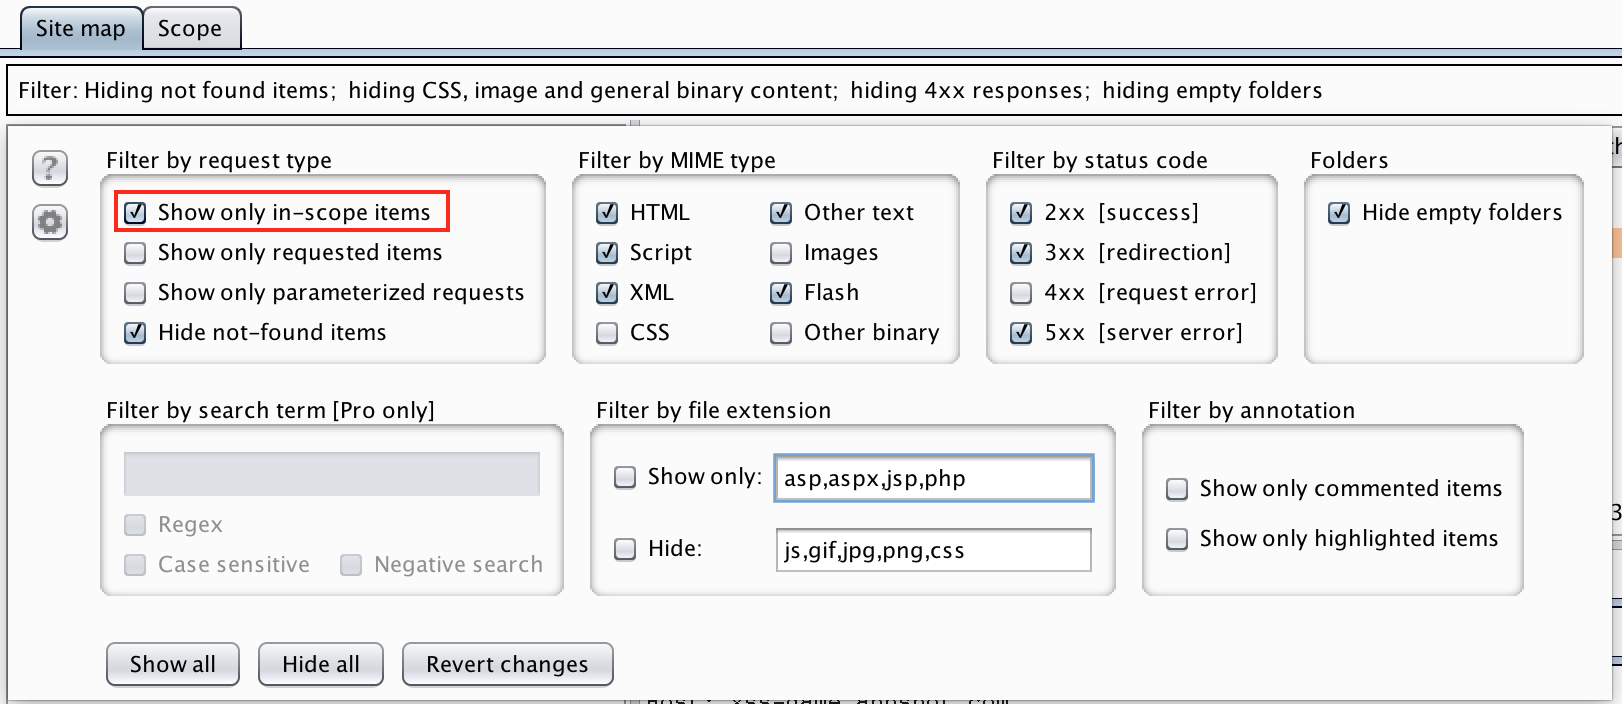
Now, you should only see XSS Game urls in the lefthand pane of the Site Map.

Burp Suite Recap
In this blog post, we covered installation and setup of BurpSuite and a proxy tool. We intercepted our first request, and reviewed filtering, options, and HTTP history in the Proxy section. Finally, we looked at the Site Map in the Target Tool, as well as how filtering, scope and icons work within this section.
Next up will be Spider, Intruder and Repeater!